04.05.2008
by Wolfgang Schüler
Automation: Pro and Contra
While working with a sequencer program sooner or later you will detect the possibility of automating parameters.
These parameters can be :
- volume, panorama, amount of send effects, etc. of a track
- filter cutoff, LFO frequency etc. of an instrument plugin
- delay time etc. of an effect plugin.
Automations can be inserted and controlled by a pencil tool via mouse or with a controller keyboard or
- incase you have integrated hardware equipment into your virtual studio - by srewing arround on the knobs
while recording.
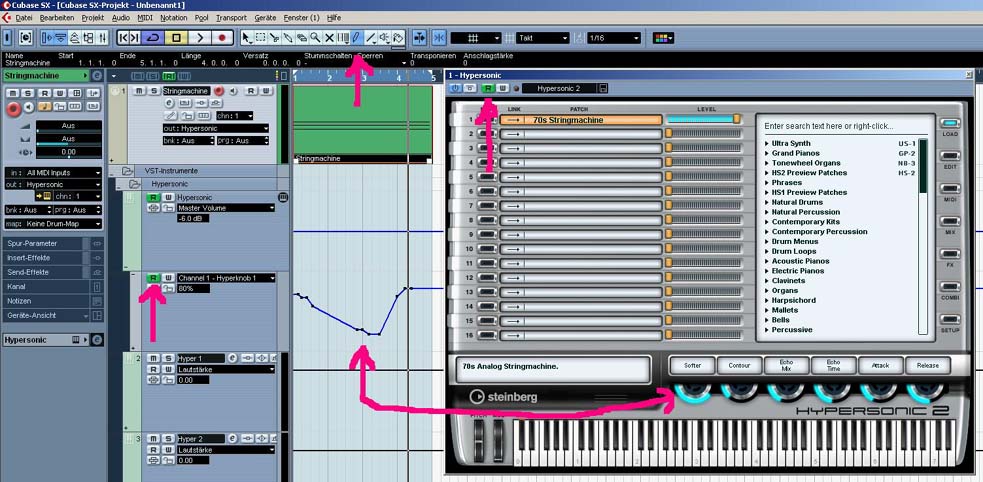
Picture: this is how it looks. You can see the automation curve for the "Softer" parameter of Hypersonic´s
70s Stringmachine in Cubase SX 3 (both are Steinberg products). In Cubase it is nececary to activate the
"W" button for Writing and when you are done to activate the "R" button for Reading the data.
I have also marked the pencil tool with an arrow.
The nice thing about Hypersonic is that it has 6 knobs which represent the 6 most effectful parameters for
each individual sound (but you can choose other parameters too). So soundtweaking and effectful
automating gets real easy.
This is not an advertising article but I can say that I´m truely satisfied with Hypersonic and Cubase.
But of course there are many other great tools available that offer similar features.
And this is how it sounds:
The advantage of automation is easy see: the sequencer "remembers" all the changes
you´ve done on a track, on a plugin or on the whole mix. In earlier days all these
changes had to be done on the fly while recording the track or mixdown (just imagine
3 guys screwing on 10 parameters at 1 synth, 1 EQ and 1 Delay to hopefully get recorded all soundchanges
correctly). Nowadays you open your project from last night and the sequencer
reproduces all these changes correctly and all by itself. What a wonderful luxury!
But that´s not all: in case you detect that e.g. on track is too loud or there is too
much reverb on the guitar you can correct this easily by changing the automation
curve. Beginners might ask: "Why should I change the parameters of this cool
synth sound or eq preset?". The answer is: to get your mix more alive and
professional. Lets say you have a bassline repeating 32nd times. You can
preserve it from getting boring with subtle changes in the sound parameters
done with automation e.g. playing with the filter cutoff frequency. Or you want
a certain word in the vocals to be pronounced - no problem - take the volume
curve and draw a peak at the point where the word occurs.
Working with automations also offers infinite possibilities in creating amazing
effects. For example take a piano chord and insert a long delay. Then send
this delay to a reverb via send-effect and raise the amount of reverb from
zero to whatever and then take the result and edit it with a moving eq-filter
and so on. And all the time you have full control over what happens and you
can always correct your creation simply by editing the automation curves.
The work with automations differs slightely from sequencer to sequencer
so have a look at the manual. But almost all sequencer softwares have in
common that they use visible curves following the tracks and are editable
with a pencil tool.
Controller keyboards have the advantage of using real knobs to control
parameters while recording (instead of frigeling with the mouse). Normally
the assignement which knob controlls which parameter is easy. Nevertheless
for fine tuning the mouse is the tool of first choice.
As I have mentioned the creative use of automations brings your mix alive
and lifts it to a more or less professional level.
One important question is: "When should I start using automations?"
This question is so important because automations can bring you in trouble
too. In the worst case you change a certain part of your mix and destroy
your fine automation construct. Or loose the overview of what happens
and what should happen in your mix. Even when you work with only a few
audio and midi tracks - by creatively using automations you will be confronted
with dozens of tracks soon.
This mostely happens when you rearrange your project or add new tracks
that demand a new sonic balance in your mix.
Helpful is to place automation tracks close together that correspond to a audio or midi track.
So the best point should be when you are finished with the arrangement and the amount of tracks.
But sometimes there is a problem (mostely in electronic and ambient styles)
and that encounters when building your mix uppon sounds by themselves
(as opposed to classical music to mention the other extreme). In this case
you often will use automations right from the start to get a certain sound(scape)
which inspires you for the further work. In this case this is a risk you have to live with.
For normal pop, jazz and classic productions I recommend to add automations when the
whole arrangement is finished.
A few Tips:
- for effect plugins put the effect amount to 100% (wet) when using them as send effects.
- in case you use sub-busses do the automations on the individual tracks - not on the sub-bus
maintrack (also called "grouptrack")
("What is a SUB - BUS?" - Let´s say you want to have a professional drumsound. So you take
one track for the bassdrum, one for the snare, one for tom1 and so on. The reason for this is
simple: you can edit each part of the drumset individually with eq, reverb etc. Normally all tracks
are routed to the stereo output of your sounddevice. But know let´s say you want a certain
amount of compression for ALL drum instruments or want to change the volume of the complete
drumset with just one fader. Here it is useful to create a sub-bus (or grouptrack - both words
mean the same). Now in your mixer you route all drum tracks to this grouptrack. The grouptrack
itself is routed to the stereo output of your sounddevice. The drum grouptrack "gathers" all drum
tracks in your project to one track. Now you insert the compressor of your choice to this grouptrack
and all drumtracks will get the same amount of compression. Without the gouptrack you would have to
insert the same compressor with the same settings to each drumtrack which can easily reach 10 or
20 tracks - what means you would have to use 10 or 20 compressor inserts which will cost lots of
CPU resorces AND makes any compressor parameter change for the whole drumsection a nightmare.
The compressor example shows clearly the advantage of using sub-busses. Classical sub-busses are
for Drums, Basses, Guitars, Keyboards, Vocals and Soundeffects.)
I hope you enjoyed this article.